
Airbrushing Miniatures for Beginners: The Complete Guide
I want to welcome all hobbyists who are curious about getting started with airbrushing. Like many painters, I was at the start, (very)intimidated by airbrushes and unsure if the money and time investment would be worthwhile.
However, I was wrong, very wrong. So so wrong! After taking the plunge and learning how to use an airbrush properly has been one of the most rewarding skills I’ve pushed myself to learn in the hobby. It has allowed me to achieve smooth blends, vivid gradients, precision details, and spectacular special effects that would be incredibly difficult with a normal brush.
Plus it has huuuuugely increased my speed and efficiency when doing some batch painting for terrain, vehicles, monsters, and troops for my armies on the battlefield.
In this complete guide, I will cover everything you need to know as a beginner looking to bring airbrushing into your miniature painting workflow – from essential equipment and accessories to techniques, cleaning, troubleshooting, and more.
Airbrushing Miniatures for Beginners: Choosing Your First Airbrush
Read a full guide here on the Best Airbrushes for Miniatures
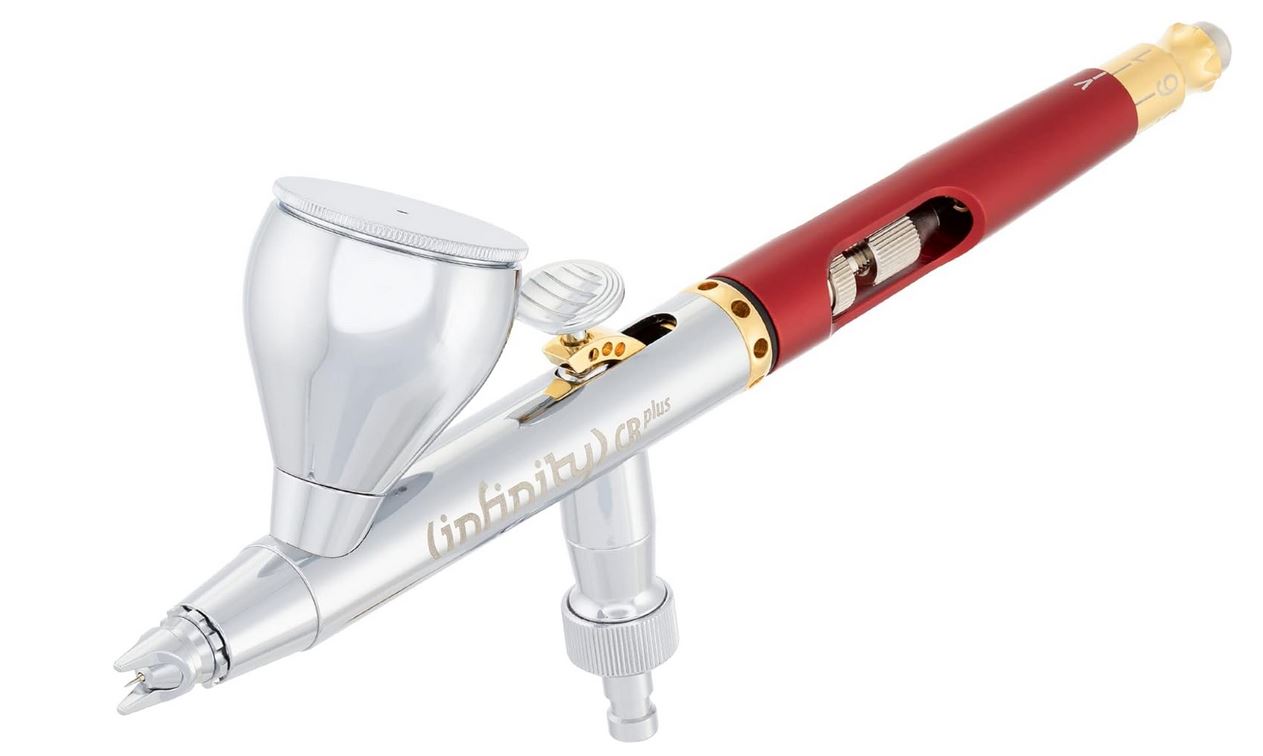
With the huge variety of airbrush options and models available from dozens of brands, deciding on your first airbrush can definitely feel overwhelming initially. Based on years of experience testing numerous alternatives, here are the most important criteria I recommend evaluating:
Feed Type: Go with a gravity feed design. Gravity pulls paint directly down into the nozzle as needed without relying on heavy airflow. This allows more control at lower pressures – ideal for detail work on miniatures.
Action Type: Dual-action is essential. Pushing down controls air, pulling back handles paint flow, so you can blend together precisely. Single action airbrushes lack finesse.
Needle/Nozzle Size: 0.2-0.4mm is optimal. Tiny details require 0.15mm but clog easily. 0.5mm+ is better for vehicles and terrain. Interchangeable sets provide flexibility.
Reliability: Stick with reputable brands that hobbyists trust like Iwata, Badger, Paasche, Harder & Steenbeck rather than cheap no-name options which can quickly disappoint.
As a great starting point that balances affordability and quality, I recommend the Badger Patriot 105. It’s a beloved workhorse gravity feed dual action airbrush that rarely clogs and can tackle everything from miniatures to terrain beautifully right out of the box.
Airbrushing Miniatures for Beginners: Essential Equipment
Looking for a full overview of all equipment? Read here for Beginner Equipment Set for Airbrushing
While it’s possible to spend thousands of dollars on high-end gear, you can acquire everything needed to start airbrushing miniatures for under $300 if you stick to reasonable choices. Here’s an overview of the bare essentials:
Airbrush: As mentioned above, go with the proven Badger Patriot 105 or similar 0.2-0.5mm gravity feed dual action airbrush from a leading brand. Expect to spend $100-300 depending on features and quality.
Compressor: Look for a quiet compressor with an integrated air storage tank and moisture trap like the Badger TC-910 Aspire Pro or Iwata IS-50 to maintain smooth pressure. $150-250 range.
Quick Disconnect: Makes detaching your airbrush for cleaning easy. Grex Air Valve is a nice option with built-in pressure adjustment. Around $50.
Cleaning Pot: Crucial for spraying out paints between color changes and keeping the needle wet to prevent tip dry. Iwata makes a nice model with built-in holder for around $10.
Air Hose: A 6-8 foot braided hose with correct fittings to connect airbrush and compressor. Usually included with the compressor.
Paints & Primers: Stock up on properly thinned acrylic paints designed specifically for airbrushes instead of regular brush-on acrylics to avoid constant clogs and headaches. Vallejo and Badger Minitaire are great options.
That covers the absolute fundamentals. While it’s an investment upfront, taken care of properly this setup can serve you for many years before upgrades are warranted. Next let’s look at some additional accessories that make airbrushing safer, easier and more efficient.
Airbrushing Miniatures for Beginners: Additional Accessories
Spray Booth: Traps overspray and helps tremendously in avoiding mess. Can also reduce inhalation of atomized paint particles. Look for models with integrated turntables and removable filters like the Master Airbrush Portable Hobby Spray Booth which runs under $100.
Respirator Mask(Not optional): For maximum protection when airbrushing, invest in a quality respirator like the trusty 3M 6000 Half Facepiece Respirator. It really cuts down on accidentally inhaling that acrylic overspray which can aggravate allergies and asthma over time. Around $25-50 depending on included filters.
Moisture Trap: Excess moisture can ruin a perfectly good paint job. Traps water before it enters air line. Badger makes a nice one for $30. Highly recommended for swampy regions.
Gloves: Nitrile gloves let you easily handle minis when still tacky while avoiding smudges and fingerprints compromising paint. Disposable and cheap for peace of mind.
Airbrush Holder: Designed for conveniently storing your airbrush trigger-down to avoid tip dry without needing to fully clean between quick color changes. XtremeAir makes a nice rotating acrylic holder for around $13. Helpful for keeping needles from bending.
Cleaning Tools: Must-have for properly maintaining your airbrush. Look for sets that include miniature pipe cleaners, small soft bristle brushes, precision needle cleaners, lint-free swabs, and more specialized tools tailored for breaking down popular airbrush models for deep cleaning. Master Airbrush makes a very thorough 12 piece set for $25 that will have you covered for all cleaning eventualities.
Airbrushing Miniatures for Beginners: Proper Airbrush Technique
While airbrushes allow you to spray paint across larger areas than possible with a standard brush, they have a learning curve when it comes to truly mastering control. Be patient with yourself. Nobody picks up an airbrush and instantly paints award-winning display level miniatures. It takes plenty of practice establishing proper technique.
Here are some key skills to focus on developing in your first few weeks airbrushing:
Balancing Air & Paint Flow – You want just enough airflow to atomize the paint without causing runs and splatters. Start around 20psi. Thin paint to roughly whole milk consistency. Always press down for air before pulling back paint trigger. Release paint before letting airflow fully stop. This prevents tip dry from paint building up and clogging your needle
Achieving Fine Lines & Details – Use the edge of a bent paper clip or shaped tape to mask off areas you want to remain untouched. Position airbrush very close to surface, around 1⁄4 inch away. Gently ease back paint flow lever rather than pulling all the way for precise thin lines and details.
Building Layers – Completely drying layers between passes allows colors to build without inadvertently blending together into muddy tones. This helps greatly with subtly highlighting raised areas near edges to create definition through light and shadow.
Wet Blending – With sufficient airflow, you can intentionally spray overlapped areas before preceding coats fully dry to create ultra smooth blended color transitions. This takes more practice but lets you achieve award-winning gradients.
Once you feel satisfied with your grasp of the fundamentals on scrap pieces, you’ll be ready to move on to actual miniatures. I recommend starting with terrain pieces to learn. Larger surface areas are more forgiving. As you become comfortable, advance to standard infantry troops, then larger models, resin vehicles, epic monsters and so forth. It won’t be long before you’re airbrushing like a pro!
Looking to get more smooth coats? Read here for How To Get Smooth and Thin Airbrush Coatings
Airbrushing Miniatures for Beginners: Cleaning & Maintenance
While using your airbrush is hugely fun and rewarding, keeping it properly maintained does require vigilance and care to prevent frustrating clogging and breakdowns. Here are my top tips for keeping your airbrushing setup running like a well-oiled machine:
Clean Thoroughly Daily – Follow manufacturer guidelines for fully breaking down and cleaning your specific airbrush model after each session to prevent paint build up. Soak and flush all parts with cleaning solution, carefully inspecting for any lingering debris that could impede airflow or stick moving components.
Lubricate Components – Once parts are fully cleaned, apply a tiny amount of airbrush lubricant like Regdab Oil to the needle and trigger assembly ensuring smooth movement next session.
Check Connections – Ensure all hose connections are tightly sealed to prevent air leaks around fittings compromising spray consistency and pressure. Also inspect seal rings for wear and regularly replace parts like needles and nozzles which degrade over time from friction.
Filter Paints – When refilling paint, pour through fine mesh funnels or ladies’ stockings into the color cup to catch any dried flakes or lumps from old thicker acrylics that could obstruct airflow and cause splatter or clogs down the line.
Use Moisture Trap – Water vapor can build up unnoticed in air hoses from constant running of the compressor and moisture in the air itself. Inline moisture traps prevent this excess moisture from compromising paint adhesion. Highly advisable for humid climates and active painting.
Store Safely – Keep your airbrush in a hard case or sturdy housing when not in use to protect sensitive parts like needles from bending which can subsequently distort the precision spray. Putting it safely away between sessions also minimizes tempting shortcuts on cleaning routines.
With consistent adherence to quality cleaning and maintenance best practices, you’ll be able to rely on consistent optimal airbrush performance for years of trouble-free creative enjoyment around the painting table without losing time to pesky equipment malfunctions or failures.
Cleaning Airbrushes can be difficult read up here on Airbrush Maintenance and Cleaning for Miniatures

Airbrushing Miniatures for Beginners: Common Airbrushing Problems
Even with the best preparation and maintenance, occasional airbrushing problems inevitably creep up from time to time. Here is a quick troubleshooting guide to the most common beginner issues along with potential solutions to get you quickly back up and running:
Clogs & Poor Flow – Soak entire airbrush for 10 minutes in warm soapy water then gently clean with pipe cleaners. Increase PSI incrementally until unclogged. Replace damaged needle/nozzle. Strain old thick paints.
Splattering – Paint too thin or airflow too high. Try thicker mix sprayed from further distance around 4-6 inches away. Lower PSI if still occurring. Ensure colors properly intercoat dried.
Uneven Spray – Bent needle. Gently massage straight with needle cleaners or pliers wrapped in cloth. Do NOT scrape. Ensure nozzle & needle properly aligned when reinserting parts.
Dried Tip – Clean needle tip frequently between colors while still moist. Store needle down to avoid paint drying on exposed tip causing clogs from surface tension issues.
Skipping – Paint too thick. Properly thin and strain before pouring into feed cup. Test flow on paper. Increase PSI incrementally to atomize thicker mixes if unavoidable.
Bubbles – Clean airbrush cup with degreaser. Bubbles introduce uneven flow compromising atomization. Ensure mid session cleanings allow all moisture to fully evaporate before respraying.
With troubleshooting guidance, you’ll confidently know how to efficiently diagnose and resolve common airbrushing problems when they pop up so you can rapidly return to the joy of creating. And over time as your skills improve, many issues will simply fail to manifest in the first place!
Want to read more about mistakes and what not to do? Read here for Common Airbrush Mistakes on Miniatures
Airbrushing Miniatures for Beginners: Taking Your Miniatures to the Next Level!
As you can see, airbrushing does require an enthusiastic commitment in terms of financial investment, dedicated practice developing specialized techniques considerably different than traditional brush painting skills, maintaining strict cleaning routines, and learning to troubleshoot technical issues.
But across the hobby spectrum, the vast majority of veteran miniature painters who have taken the airbrushing plunge over the years – including the talented team here at Warhammer Universe – will enthusiastically assure you that stepping through the initial learning curve to add airbrushing to your toolkit is overwhelmingly worthwhile in the long run.
You’ll achieve spectacular models that wow gaming friends and fellow painters alike while unlocking an incredibly fun new dimension for creative expression bringing favorite characters and fearsome monsters to vivid life. And it happens a lot faster with far less physical effort than reliance on standard brushes alone.
So when inspiration strikes and patience allows, I wholeheartedly encourage giving airbrushing a try! Carefully follow the guidance in this guide and it won’t be long before you’re expertly spraying smooth fades, precision edges, vivid zenithal contrasts, and subtle OSL glows that captivate on the battlefield and display shelf alike.
The airbrush learning adventure awaits, my friend!
Related posts:
 The Ultimate Guide to Airbrushing Miniatures – Perfection Against Xenos
How To Prep Miniatures For Airbrushing: Simple Steps to Smooth Uneven Surfaces
The Ultimate Guide to Airbrushing Miniatures – Perfection Against Xenos
How To Prep Miniatures For Airbrushing: Simple Steps to Smooth Uneven Surfaces
 How to Airbrush Glaze Miniatures: Conquer 6 Common Mistakes with These Troubleshooting Secrets
 How to Airbrush Blend For Miniatures: Unlock the Potential of Your Airbrush for Stunning Results


