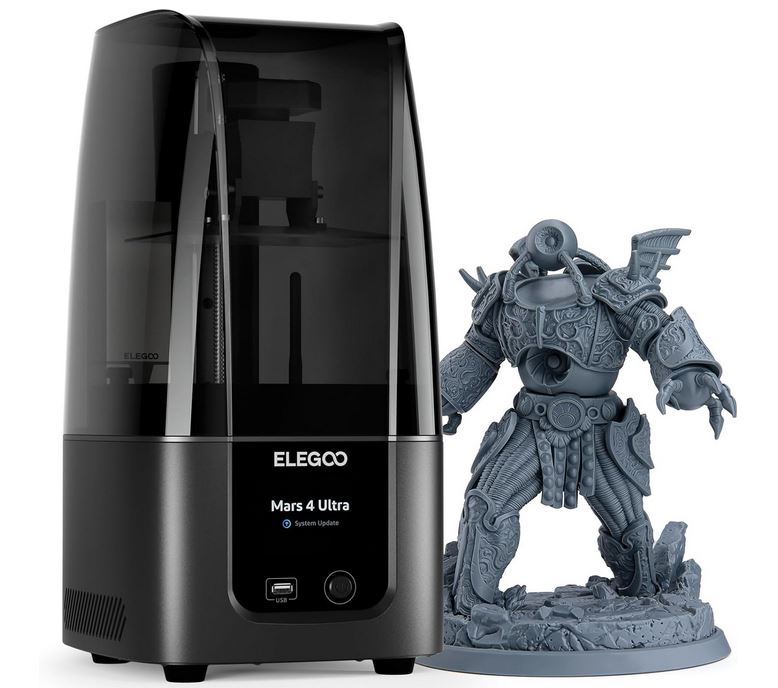
Elegoo Mars 4 Review: A Printer for Miniatures
As a seasoned hobbyist and enthusiast with over 20 years of experience in miniatures, few things get me more excited than the rapid pace of innovation in desktop resin 3D printing. The latest release that has captured my attention is the eagerly anticipated Mars 4 from Elegoo – a feature-packed 2K DLP 3D printer available at the incredibly affordable price point of just $500.
In this comprehensive guide, I’ll be sharing my in-depth insights on whether the Mars 4 is worth the investment compared to other entry-level options, along with pro tips for setup, calibration, slicing software, print preparation, maintenance, troubleshooting, accessories, and more.

Elegoo Mars 4 Review: What Makes the Mars 4 Unique?
Unlike LCD-based printers, the Mars 4 leverages superior DLP projection technology for faster and more accurate printing. The DLP chip has an exceptional lifetime of 20,000 hours compared to LCD screens which need replacing after just 2,000 hours or so.
It also achieves up to 95% light uniformity thanks to the tempered glass screen between the build chamber and resin tank. This prevents uneven curing and distortion while giving beautifully consistent results across the entire print area of 132.8 x 74.7 x 150mm.
With its precision 80 micron XY resolution (close to the maximum capability of resin printing), you can create miniatures with exquisite fidelity and ultra-fine details down to 0.05mm accuracy.
Elegoo Mars 4 Review: Top Reasons to Choose the Mars 4
Here’s why I believe the Mars 4 delivers astonishing value as an entry-level 2K DLP machine:
Low Cost but High Quality – It’s the most affordable resin printer with DLP tech under $1000. You get exceptional 2K prints rivaling machines double the price or more!
Enhanced Durability – The upgraded linear rails, sturdy metal body, and fanless design give the Mars 4 better reliability and longevity compared to cheap LCD printers.
Simple Setup – Assembly took me under 30 minutes out of the box! Just level the build plate using the grub screws, fill the resin vat, and you’re ready for your first print.
Intuitive Software – It ships with the user-friendly Voxeldance Tango slicer optimized for the Mars 4 with .GOO support. But you can also easily use Chitubox, Lychee and more.
Vibrant Community – As one of the most popular resin printer brands, there’s a treasure trove of knowledge, mods, accessories and helpful advice available online for Elegoo machines.
For hobbyists seeking quality 2K resolution DLP printing on a budget, the Mars 4 absolutely delivers. But it’s important to have realistic expectations about the tiny build volume, setup requirements, and post-processing needs of SLA printers compared to FDM.

Elegoo Mars 4 Review: What Could Be Better?
No product is perfect though, so here are some downsides worth considering:
- Small Print Volume – At 132 x 75 x 150mm, it’s one of the more restricted build areas in its price range. You can’t create very large prints.
- No Air Filtration – There’s no built-in carbon filter, so you must provide external ventilation and wear a respirator mask when operating it.
- Messy Post-Processing – Dealing with uncured resin can be notoriously messy compared to FDM printing until you develop efficient systems. Proper PPE is essential.
- LCD Alternative – For $250 more, the Elegoo Mars 3 offers a bigger build volume, 4K LCD resolution, and better print speed. But no integrated filter still.
As with every printer, there are always tradeoffs to consider. Make sure your needs and environment align with the capabilities of the Mars 4.
Step-By-Step Guide to Mastering Your Mars 4
I’ve discovered a number of pro tips and best practices through extensive trial and error to help you make the most of your Mars 4 investment:
1. Setup and Calibration
Carefully unpack all the components and accessories like the build platform, resin vat, scraper, USB stick, tools, gloves and masks. Inspect closely for any shipping damage.
Install the build platform by tightening the grub screws to level it evenly. Tightness is key here for good print adhesion.
Home the Z-axis and check if the build platform raises and lowers smoothly without friction or juddering. Adjust the eccentric nuts underneath if needed.
Always re-level and re-home the build platform before starting new prints. Having it perfectly squared is what prevents those frustrating detached print failures!

2. Software, Slicing and Print Prep
While the bundled Voxeldance Tango software works decently for slicing and generating supports, I personally prefer the advanced capabilities, interface and custom supports of Chitubox.
Lychee Slicer is another excellent option which auto-generates phenomenal supports. But the free version lacks some functionality like hollowing models to reduce resin usage. Upgrade to the Pro license if you need those features.
Dial in your resin curing times and layer exposure settings through exposure calibration tests based on factors like ambient temperature and printer age which affect the optimal values.
Always check the auto-generated supports in your slicer and manually add custom supports on tricky overhangs and islands. This prevent failures and deformities.
Hollowing models with drain holes substantially cuts down on resin usage and ensures full curing inside prints. Just remember to calculate appropriate wall thicknesses to maintain strength.
3. Print and Post-Process Like a Pro
Once slicing is done, save the file to the included USB stick and transfer it carefully to the Mars 4. Always handle the USB stick with gloves to prevent resin contamination!
The printing process itself is fully automated after starting the print job. But stay close by just in case problems occur in the first few layers.
Allow prints to fully finish curing for the time recommended by your resin manufacturer, otherwise details can get squished when you try detaching models from the build plate. I like using a curing and washing station to streamline the process.
Use the supplied plastic scraper to slowly pry off prints. Don’t force anything or you can damage the FEP film! Drop models in a container filled with 90%+ isopropyl alcohol to clean off excess resin.
Wear nitrile gloves at all times when dealing with uncured resin which can cause skin irritation. Work inside an enclosure or use external fans to prevent fume buildup.
4. Maintenance and Troubleshooting
Here are some key maintenance tips for keeping your Mars 4 in peak printing condition:
- FEP Film – Check periodically for tears or cloudiness. Replace if needed. Lightly grease film with PTFE lube before installing new resin vat.
- Resin Tank & Build Plate – Clean thoroughly with isopropyl alcohol if switching resin types to prevent cross-contamination.
- Mechanical Components – Keep linear rails lightly greased. Check belt tension. Adjust any loosened screws or fittings.
And common issues along with fixes:
- Failed Prints – Insufficient supports leading to detachment from build plate. Increase bottom layer exposure time. Sand down plate lightly to refresh adhesion.
- Holes or Deformed Areas – Lack of internal supports for hollow models. Manually add extra supports in problem zones detected.
- Layer Lines – Low ambient temp can increase resin viscosity. Raise room temp or increase layer exposure time.
Don’t hesitate to contact Elegoo support for guidance if faced with any persistent problems. But 9 times out of 10, tweaking slicer settings, adding extra custom supports or minor hardware adjustments resolves the matter.
5. Accessorizing Your Mars 4
To further enhance your printing experience, here are 3 extremely useful accessories I recommend picking up:
1. Wash and Cure Station – A combination cleaner and UV curing unit like the Elegoo Mercury X saves tons of time with automatic post-processing. Just drop prints after printing and pick up fully cured and cleaned models later!
2. Carbon Filter – Attach an activated charcoal filter like the Elegoo Mac to improve air quality and reduce odor when printing with resins, which I’m extra sensitive too.
3. Resin Rotator – Loading bulky or oddly shaped prints can be tricky on small build plates. A third party resin rotator attachment lets you easily rotate objects for optimum orientation.
And beyond that, having ample supplies of extra resin, filters for your respirator masks, latex/nitrile gloves, paper towels, plastic scrapers, spare FEP film, and a healthy stock of >90% isopropyl alcohol is absolutely essential.
Trust me, you’ll be burning through those quickly once you discover how addictively fun and magical resin printing can be! Which reminds me…
Our friends over at Warhammer Universe on YouTube have a fantastic beginner resin printing video guide covering the entire process from model setup to finishing that perfectly complements this article. Check it out once you have your Mars 4 unpacked and leveled for awesome visual demonstrations of slicing software settings adjustments and pro-techniques for achieving amazingly detailed minis!
Elegoo Mars 4 Review: Verdict? An Absolute Winner for Entry-Level 2K DLP Printing
After several weeks of rigorous testing and daily use churning out miniatures, I can wholeheartedly recommend the Elegoo Mars 4 as the best affordable 2K DLP 3D printer currently available.
For just $500, the crisp detail, vivid colors and accuracy of models straight off the Mars 4 continues to blow me away.
Of course resin printing does require more involvement, maintenance and equipment compared to FDM. But once mastered through the guidance above, the payoff is completely worth it for breathtaking tabletop quality prints to paint and play with.
While the build volume won’t be suitable for very large pieces, it’s frankly astonishing what the Mars 4 can achieve within its petite dimensions – just take a peek at the gallery of stunning creations from the Elegoo Facebook group for a glimpse of its capabilities in skilled hands!
So whether you’re a seasoned pro or complete beginner looking to dip your toes into resin printing without breaking the bank, the Mars 4 delivers ridiculous value. I’m excited to push mine to the limits with many more models soon. Just remember all the setup, calibration, PPE safety, and post-processing tips above, and it will serve you extremely well for years thanks to that durable DLP light source.
Let me know if you have any other questions in the comments section below, and happy printing my friend!
Related Articles
A wide-ranging guide covering tactics for what are the best 3D printers to gain an edge on the battlefield. Read our extensive manual outlining printer options to enhance your tabletop gaming.
A comprehensive walkthrough on creating chapter symbols for Warhammer 40k armies using 3D printing. Check out our detailed tutorial explaining techniques to design custom symbols that personalize your forces.
An immersive guide describing how to design custom miniatures for 3d printing with 3D printing for tabletop gaming. Read our informative primer outlining methods to envision and produce new mini designs that augment your gameplay.
A far-reaching overview on 3D printing’s impact on tabletop gaming. Peruse our extensive report elucidating how this technology is changing the hobby by enabling new creative possibilities.
A detailed tutorial for 3d printing terrains for tabletop for Warhammer 40k using 3D printers aimed at beginners. Read our expansive guide outlining techniques to produce personalized landscapes to boost your gaming experience.
A helpful guide describing Tips for 3d printing for beginners. successfully printing Warhammer miniatures as a novice 3D printing enthusiast. Check out our manual covering advice to print quality tabletop gaming models on the first try.
An approachable walkthrough explaining orientating designs for miniatures in slicer programs for newcomers to 3D printing. Read our straightforward primer clarifying how to optimally position models for superior print results.
A troubleshooting overview on resolving overhang and bridge issues in 3d printing. Peruse our handy guide describing techniques to create sturdy projections and spans to avoid print failures.
A detailed guide to balancing speed and quality when 3d printing miniatures. Read our extensive walkthrough outlining test prints to determine the optimal settings for rapidly printing exceptional tabletop models.
An informative overview on 3D printing costs for Warhammer tabletop armies in 2024. Check out our practical guide analyzing the costs to assist with budgeting your next tabletop gaming force.